
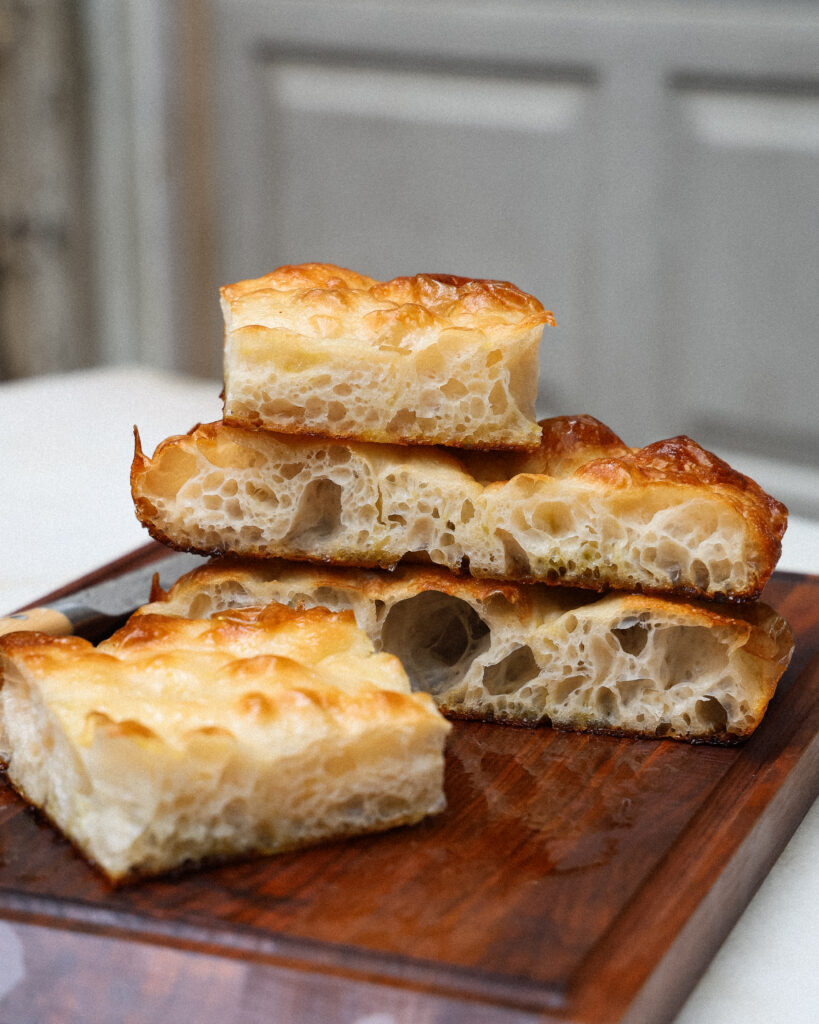
This is the best sourdough focaccia I’ve made. Hard stop. If you are looking for a sourdough focaccia that is springy, high-hydration, filled with sourdough complex flavor (my favorite), this is the perfect sourdough focaccia for you. I modeled this after the Radio Bakery sourdough focaccia that’s all over social media right now, but truly it stands on its own.
Now you may have heard of the popular Radio Bakery in Brooklyn, New York. There are always hyped-up bakeries running around this city, but this bakery has a focaccia that is to die for. This recipe is modeled after Radio Bakery’s focaccia, using the exact same process they outlined in this Bon Appetit video here, just with some added measurements, too!
If you are looking for how to make Radio Bakery’s focaccia recipe at home, or if you are just very into finding the best sourdough focaccia, this blog post will have you covered.

Table of contents
- The first thing, you’ll need a sourdough starter
- The levain
- Step 1 – Prepare the dough
- Step 2 – Mixing the dough
- Step 3 – Slaps and folds
- Step 4 – Shaping the next day
- Step 5 – Dimpling and baking the dough
- The pans I use for this Radio Bakery sourdough focaccia
- FAQs and substitutions for your sourdough focaccia
- My suggested baking schedule for sourdough leavened focaccia
The first thing, you’ll need a sourdough starter
This is what we will use to make the “levain,” or the natural leavener for the dough. If you have never made a sourdough starter before, you are essentially just fermenting flour and water, forming natural yeast and a soury tang that is addictive in breads of all kinds.
You can find my guide on how to make sourdough starter here.
The levain
For a recipe like this, you want an active levain. This means taking a rested sourdough starter and mixing in fresh flour and water to activate it. This should be done 4-6 hours before you plan to mix the dough.
A “rested” sourdough starter means it reached the height of its bubbling and fermentation the night before, and is now ready for its next feeding.
An “activated” sourdough starter means it has bubbled up to its highest height of the day, and is ready to be mixed into a dough.
To make the levain for this recipe, mix 50 grams of rested sourdough starter with 50 grams of bread flour and 50 grams of cool water. Let it sit for 4-6 hours to activate before using.
Step 1 – Prepare the dough
The Radio Bakery focaccia dough is a high-hydration dough. This is one of the few ways you can get springy, chewy bread that has those big focaccia bubbles and that signature, craveable texture. I have made focaccia many ways and many times, and I have to admit that high-hydration is the most work, but it is by far the best.
To make this dough, first start with autolyse. Autolyse is where you mix flour and water together and let them rest for 30 minutes before adding the rest of the ingredients. This lets the flour and water hydrate, making the dough tackier and easy to handle and mix.
So first mix:
- 750 grams of bread flour, I like to use King Arthur Bread Flour
- 600 grams of warm water
Let this sit, then to the bowl I like to add a tiny amount of yeast, the activated sourdough starter, salt and sugar. The yeast technically makes this an improper sourdough, but I’ve found the bread is so much better with it added.
So add:
- 150 grams active levain (see the section above for instructions)
- 2 grams active dry yeast
- 15 grams Diamond Crystal kosher salt
- 15 grams granulated sugar
- 75 grams warm water, 78-85°F

Step 2 – Mixing the dough
After you have added all the ingredients, now it is time for the most important part of the recipe: mixing the dough.
You must use a stand mixer for this. Unfortunately with a dough this high in hydration, I don’t think it can be done another way.
You will need to mix the dough for 10 minutes on medium speed, scrape down the sides, then mix for another 10-15 minutes on medium to medium-high speed.
This feels like a long time, and it is. But it is so worth it! I suggest leaving the mixer on a sturdy counter and leaving the room for a bit while it does its thing. It’s a long time to wait!
When you have checked on the dough and it has a few minutes left, feel free to turn the mixer up to high speed to ease it from a batter-like consistency to something that is tacky and pulling away from the sides. It might feel like it will never happen, but believe me, it will!!
From there, you can start the slaps and folds, which is the second way we are building up more gluten.

Step 3 – Slaps and folds
This is a way of gently shaping the dough and building a nice gluten structure as it bulk ferments (AKA, rises).
To do a slap and fold, gently transfer the dough to the pan you plan to bake it in.
If the dough is still gloopy and can’t be lifted with your hands, it’s not ready yet, you must continue mixing.
Once the dough is in the pan, use damp hands to pull it up out of the pan, letting it droop down. “Slap” the drooping pieces into the pan, then fold the dough you’re holding on top of it, creating a coil.
Rotate the way you pick up the dough so that you are now putting your hands under the non-coiled sides, then lift and slap and fold again. Do this a few times until the dough looks like the image above.
Cover, let rest for 30 minutes, and repeat this three more times. Then let the dough rest in the fridge overnight.
This is the exact timing that Radio Bakery uses in their focaccia, and it allows it to build that signature sourdough flavor while building a nice, springy texture as well.

Step 4 – Shaping the next day
Overnight the focaccia will relax into the image you see above. It might seem ready to go, but give it one more shape and you’ll have the most beautiful focaccia result you’ve ever seen!
Just like a sourdough, this focaccia will benefit from some “stitches.” Lift the dough out of the pan, it should be very bubbly by now, and coat the bottom of the pan in olive oil.
Put the dough back in the pan (don’t stress if you stitch oil into it), and use your fingers to pinch the dough across itself, “stitching” it up down the center. Then proceed to roll up the dough so that the stitches hold.
Let this relax for 1-2 more hours, it should relax to the edges of the pan.

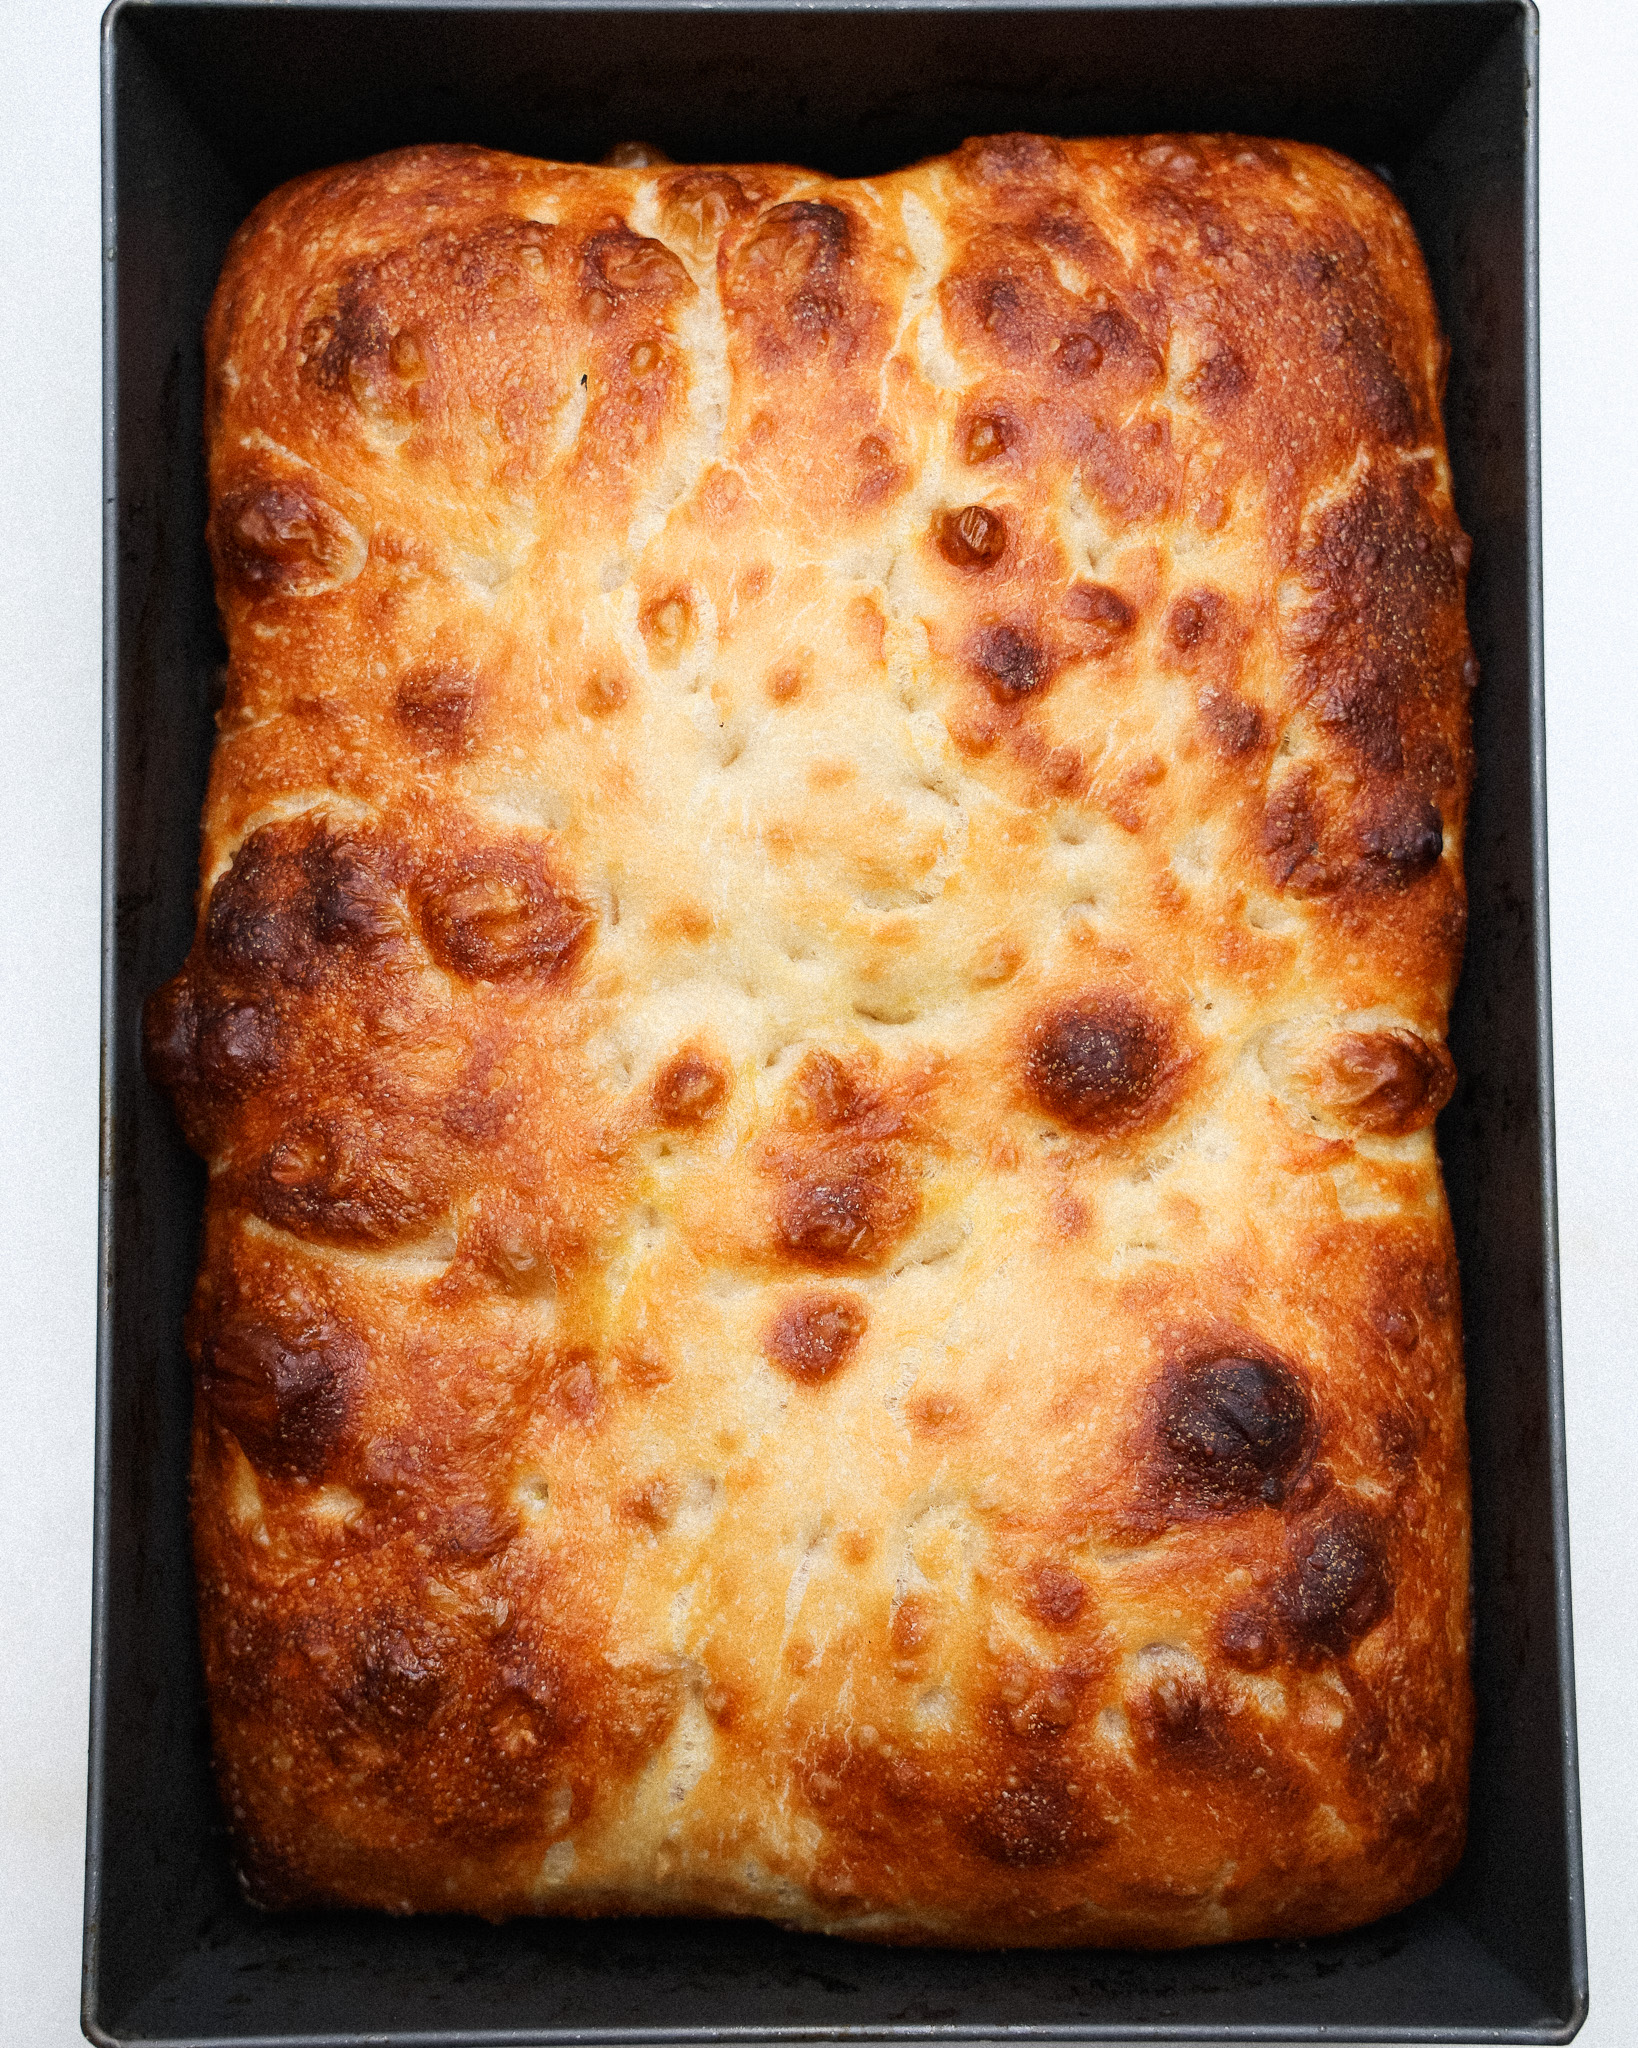
Step 5 – Dimpling and baking the dough
When the dough looks like the image above, it is ready to be dimpled and baked!
A key thing to note is that the Radio Bakery focaccia is half the height of this focaccia, but I find dimpling a thicker focaccia to be much more satisfying!

The pans I use for this Radio Bakery sourdough focaccia
I used the exact same pans that they use at Radio Bakery for their focaccia. They are Lloyd Pans and they are hand-crafted in American. You can of course get away with whatever 10×14-inch baking pan (or even 9×13-inch pan) you have, just make sure it is at least 2.5-inches deep.
This is the exact pan I use. The Detroit-style pizza pan that is pre-seasoned helps me achieve the crispiest focaccia, I highly recommend it.

FAQs and substitutions for your sourdough focaccia
I suggest only using unbleached bread flour for this focaccia. It has higher protein content which creates the gluten that holds this dough together. The only other suitable flours would be a mixture of whole wheat and all-purpose flours. Any other flour variety won’t come together in the stand mixer.
The short answer: yes. You can skip the 12 hours of fridge proofing in exchange for a 2-hour proof in a warm room. However, this does diminish the sourdough flavor that can build through fermentation, so I suggest a 12 hour proof if you have the time!
My next preferred baking vessel is a porcelain baking dish, similar to what you would use for lasagna or casseroles. Just make sure to line this with parchment paper, or else you risk the dough sticking to the bottom.
This focaccia works best at a very high temperature for a low amount of time, so get your oven as high as it can reach. From there, bake the focaccia for the called-for amount of time, but extend the time for period for 5 minutes, checking each time to see if the focaccia is deeply golden and firm on top. You’ll know when it’s done when it is fully golden on top and has some dark brown spots beginning to form.
The world is truly your oyster here! Here are some thought starters:
– Add tomato sauce and eggs and make it shakshuka-style!
– Top with rosemary and garlic for a classic take
– Top with shaved parmesan cheese for a crispy, cheesy top

My suggested baking schedule for sourdough leavened focaccia
Sourdough is only trickier than regular bread because it requires more time. Here is my suggested timeline for making this focaccia, which also works if you are at work/have a busy day!
Day 1 – Feed the levain in the morning
5:00pm – Mix the autolyse
5:30pm – Mix the dough in the stand mixer
6:00pm – First slap and fold
6:30pm – Second slap and fold
7:00pm – Third slap and fold
7:30pm – Fourth slap and fold
Rest in the fridge overnight
Day 2 – 3 hours before you would like to bake, take the focaccia out of the fridge. Let it warm up for 1 hour.
2 hours before you would like to bake, stitch the dough.
Let rest for 2 hours, dimple the dough, then bake!

And that’s it for this Radio Bakery sourdough focaccia recipe!
If you make it, please tag me on Pinterest or Instagram so I can see! It’s my favorite thing to scroll through stories and see what you all are making.
And of course feel free to leave any questions, comments or reviews! This is the best place to reach me, and I’d love to hear from you <3
Equipment
- 1 stand mixer or hand mixer (this recipe cannot be done without one, unfortunately)
- 1 quarter sheet pan I use Lloyd Pans
Ingredients
For the levain (see Note)
- 50 grams sourdough starter
- 50 grams bread flour
- 50 grams cool water
For the focaccia dough (see Note*)
- 750 grams bread flour, I like King Arthur brand
- 600 grams warm water, 78-85°F
- 150 grams active levain (ie. the mixture above)
- 2 grams active dry yeast
- 15 grams Diamond Crystal kosher salt
- 15 grams granulated sugar
- 75 grams warm water, 78-85°F
For baking the focaccia
- 1/2 cup extra-virgin olive oil
- 2 teaspoons flaky salt
Instructions
- Start the dough the day before you plan to bake. About 4-6 hours before you plan to begin the dough, mix the levain. Mix together 50 grams of rested sourdough starter, 50 grams of bread flour and 50 grams of cool water. Let this activate until doubled in size and very bubbly, about 4-6 hours.
- When the levain is bubbly and doubled in size, begin mixing the focaccia dough. Start with an autolyse: in the bowl of a stand mixer, mix together the 750 grams of bread flour and 600 grams of warm water. Cover with a damp towel and let rest for 30 minutes.
- Add in the 150 grams of active levain, 2 grams of active dry yeast, 15 grams of salt, 15 grams of granulated sugar, and 75 grams of warm water.
- Using the hook attachment on the mixer, mix on medium speed for ten minutes. The dough will look like a batter. Stop the mixer and scrape down the sides.
- Here is where it gets a bit annoying, but it is so worth it in the end. Continue to mix on medium high speed for 10-15 minutes. I suggest letting it run on your counter and leaving the room for a bit – it can feel like a long amount of time! The dough will go from wet batter consistency to tacky and pulling away from the sides. Come back for the last few minutes, and if it needs a bit of encouragement, turn the mixer up to its highest setting. Trust the process, this is my least favorite part, too.
- When you can reach in and stretch up the dough with your hands, then it is time to transfer to the pan you are baking it in. Make sure the pan is at least 2.5 inches deep.
- Begin the first series of "slaps and folds." Using a damp hand, lift the dough up completely, then "slap" it down on itself and gently fold it toward you so that it rests into a mound. Repeat this again, and as you slap and fold you'll start to see the dough gain more structure. Repeat until you have a tight mound of dough in the center of the pan. Cover with a damp towel and let rest for 30 minutes.
- After 30 minutes, repeat the slaps and folds again. Cover and repeat this step two more times, for a total of four rounds of "slaps and folds." This is building up gluten and dough elasticity.
- After the last slap and fold, transfer the dough to the fridge and let it proof for 12 hours up to overnight.
- The next day, remove the dough from the fridge and let it come to room temperature, about 2 hours. It should have relaxed out to all sides of the pan and be very bubbly.
- Gently scoop the dough out of the pan and set it to the side. Coat the pan in 1/2 cup of olive oil. Add the dough back in, then "stitch" it up the center like you would a sourdough (see Note**). Cover and let the dough proof another hour and a half, or until it has fully relaxed to the edges of the pan and is bubbly.
- Preheat the oven to 550°F. (Or as high as it can reach to that point).
- When the dough is ready, dab your fingers in a little of the olive oil pooling at the edges, then dimple the dough, pressing all the way to the bottom of the pan.
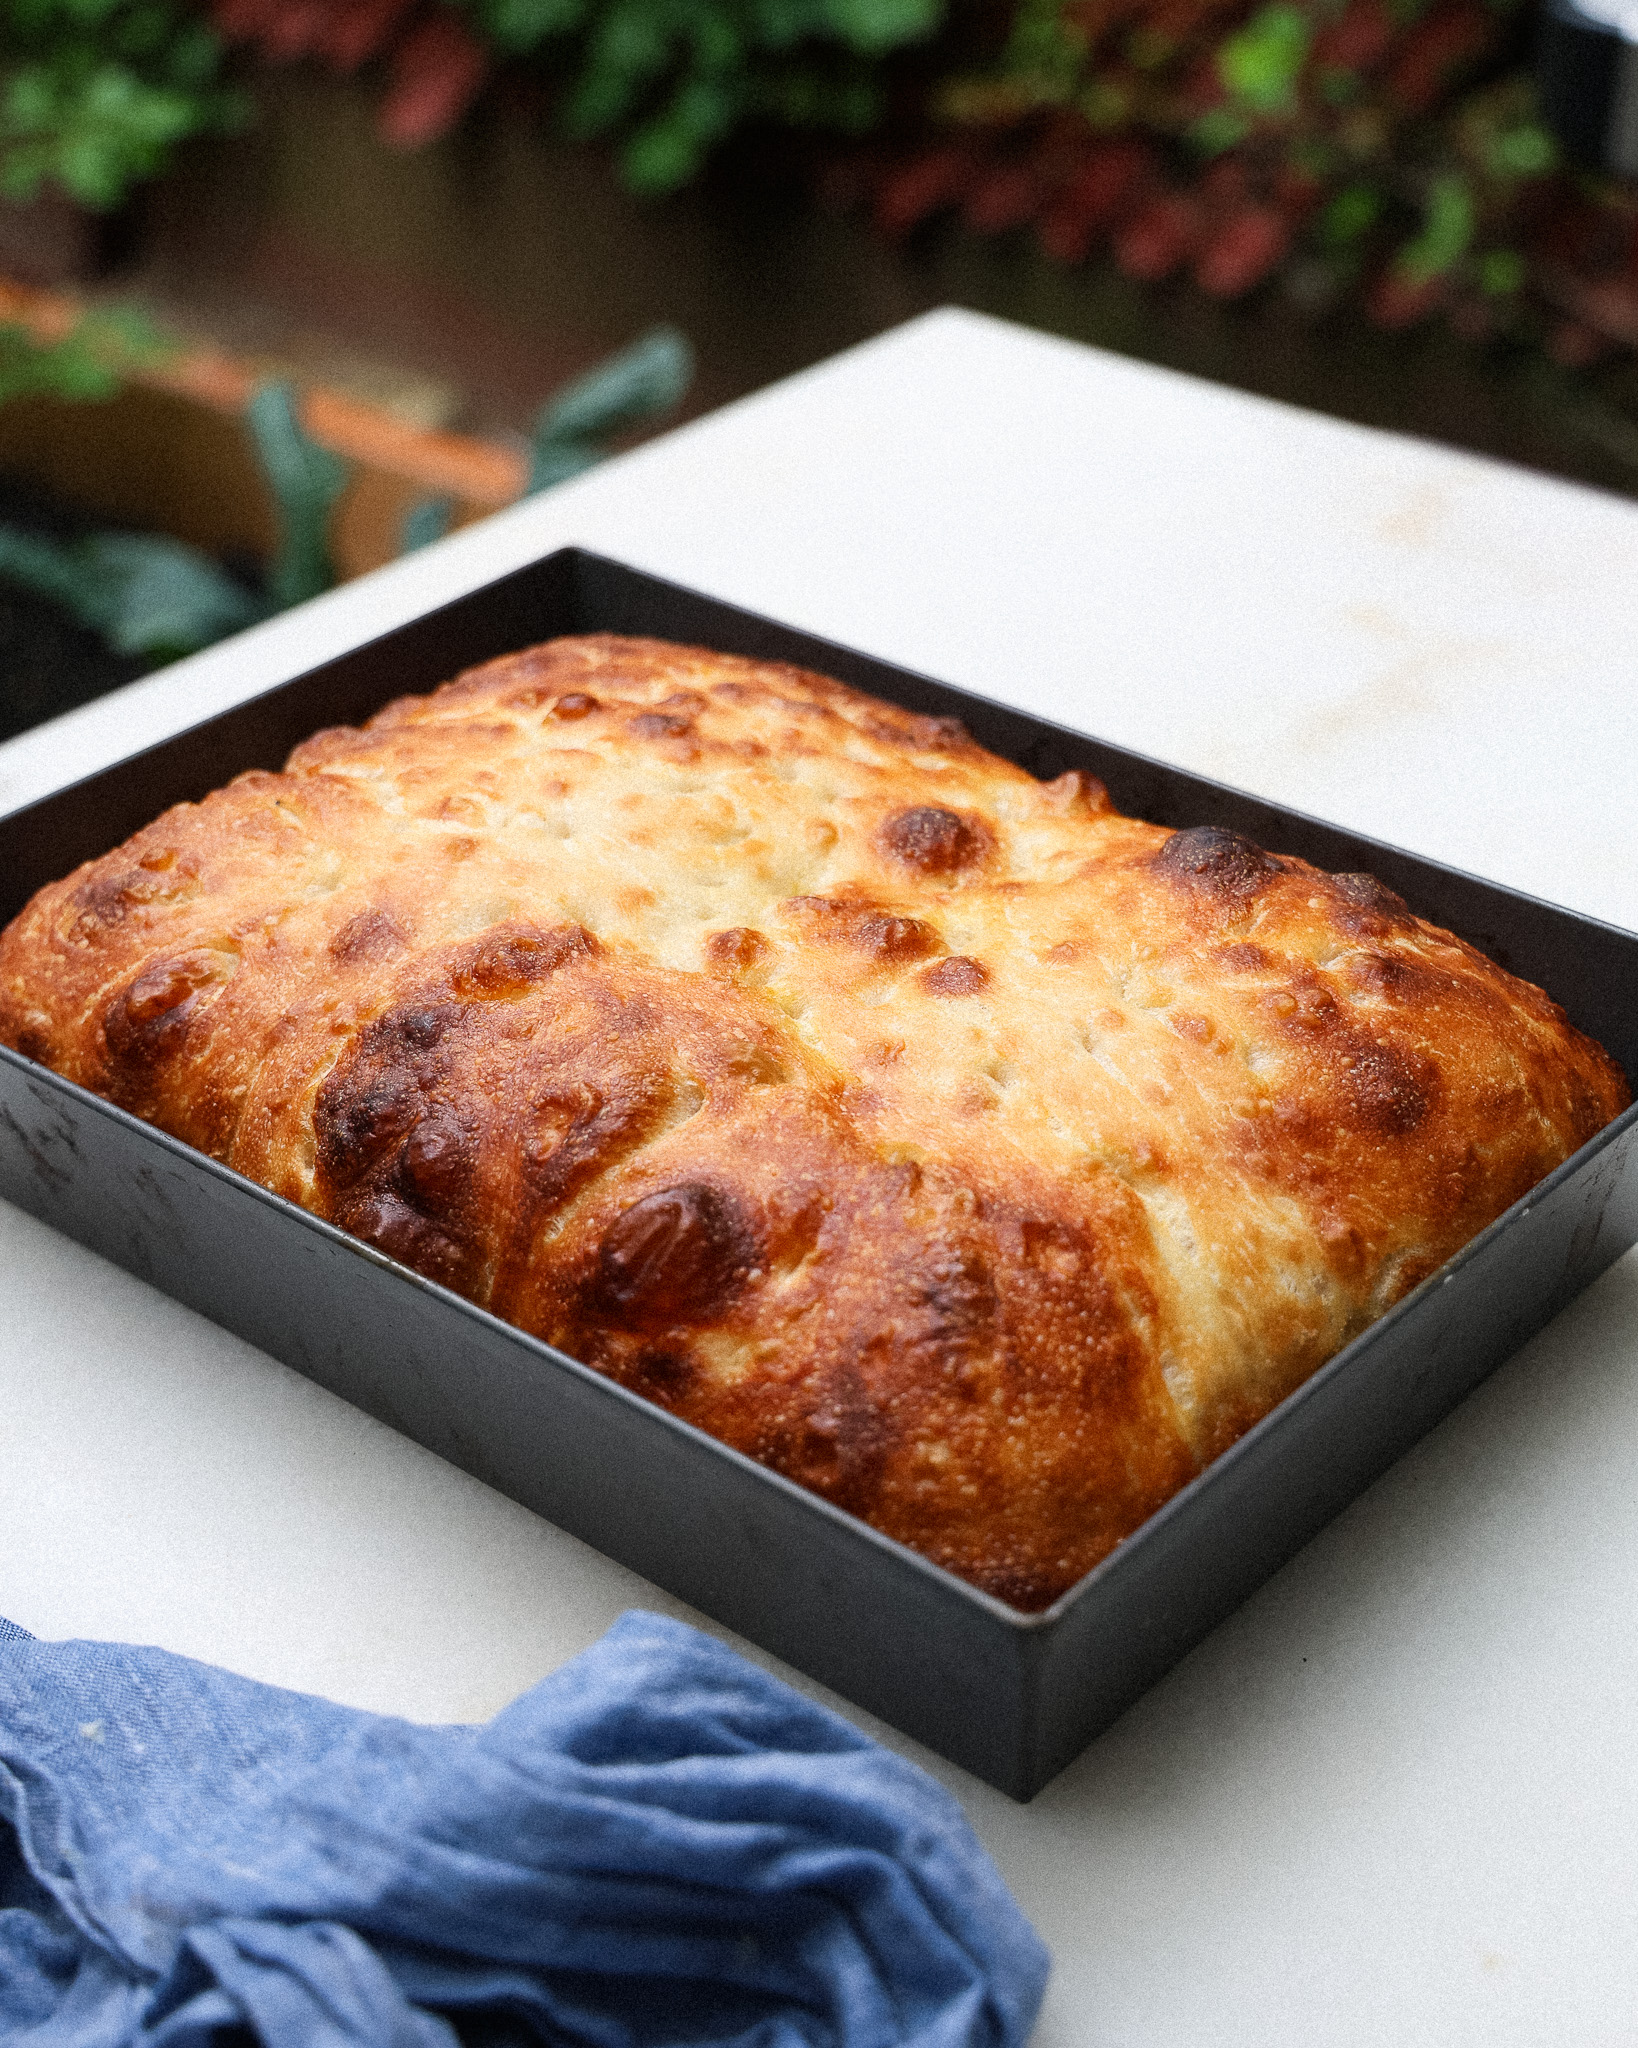
- Sprinkle the top of the dough with flaky salt and bake for 18-19 minutes or until dark golden on top. You'd rather this be a little darker on top than light.
- Remove from the oven, let it cool to the touch before removing it from the pan. Slice, and serve!

Comments
Yum! I don’t have a stand mixer but desperately want to make this. Any thoughts on trying in my bread machine? It has a knead function… I’m resisting buying a stand mixer but this recipe might just tip me over the edge.
Can’t wait to make this. Just one polite suggestion (sorry) that the first line be revised to say”16-20 hours before you plan to bake” since there is a 12-hour rest of the dough.
No this is a good note! I’ve adjusted!
We make sourdough focaccia weekly in our house so I was excited to try this recipe out. It’s fantastic, well worth the time! Only note is that some might prefer focaccia with a slightly higher salt percentage (3-3.7% = 23-28 g), depending on your taste. This brings the other flavors into balance. Replacing sugar with honey also adds a nice dimension.
this turned out AMAZING!!! definitely recommend giving it a try.
Curious how the tiny bit of yeast might impact the health benefits of a sourdough since the yeast will now assist with the rise. Is the starter still able to do its full work? Any thoughts?
Absolutely amazing! My focaccia turned out so good and its the first time I’ve cooked focaccia on the bbq too! Thank you for sharing this recipe
What do you mean by “rested” sourdough starter?
I talk about it a bit in the blog post above the recipe box, but it’s starter that hasn’t been fed in over 24 hours, the opposite of activted starter!
Can I scale down the recipe to half or double it without any adjustments? I want to bake it in an 8×8 cake pan:) Also, if I were to add toppings, would I do that when I sprinkle in the salt just before baking or before the dimple stage? Thanks in advance!
Hi there! If you are baking in an 8×8 dish, I definitely recommend halving the recipe, however note that it will still be a bit tall, about double the height of what you see in the photos (but still sliceable and delicious). For adding toppings, it depends on what toppings you plan to add! If you want the toppings to roast (tomatoes, onion, etc.) add them right after the dimpling stage, similar to a pizza topping. If you are adding toppings that might suffer under heat (tender herbs, pesto etc.) I add them after baking and let them settle into the focaccia.
OMG!! I had to come here and thank you for this recipe. I had so far a very good focaccia recipe, but this one goes beyond. It is really the best I’ve ever had. Absolutely amazing
Don’t leave the dough alone too long in the mixer … my mixer almost walked off the counter! I took it as a sign that step was done, though still very wet batter consistency.
Me again! Batter was still way too wet after about a half hour on high in the mixer. Added a few tablespoons of flour to get it to form a ball.
Hi Sarah, this might be due to the nature of your flour – they vary in protein content occasionally, so I always recommend King Arthur Baking as my brand if you can find it!
Definitely had something to do with it. I’m in Minneapolis so like to use local-ish Bakersfield flours!
This is pretty addictive stuff. I made some when my parents were visiting and they and my fiancé ate the entire pan with such intense vigor that less than half was left by the time dinner rolled around (and they crushed the rest of it by dessert).
That being said, I had issues with hydration. As suggested, I used KA bread flour, but it really would not come together on its own even after considerable time in the Kitchen Aid. I ended up adding quite a bit more bread flour to try to salvage it and eventually it was at least transferable to the pan (though I still didn’t quite get the consistency Justine did). Nevertheless, I followed the rest of the instructions as well I could even though it was a bit gloppy mess. It fell apart immediately when I stitched it but I coerced it into a few turns. Luckily it still expanded quite a bit and got lots of big bubbles. I assume it might have been a difference in starter hydration and/or kitchen humidity. Not sure, but it worked out!
I did a classic garlic and rosemary (added garlic in the dimples, rosemary after it baked with more maldon salt). I will definitely make it again soon and probably do something more creative for toppings, but even plain this is divine. Highly recommend!
Seriously, the best sourdough foccacia EVER. My Mount Rushmore of foccacias! Made it twice within a week, even fiddled with the timing (one had to prove within a coupeer of hours, because I needed it for a party, one I forgot I had to go somewhere, so had Hubs put to in the fridge somewhere along the timeline ) and they both turned out AMAZING. Now just need to make proper friends with my pan, made it straight in the pan the first time and it stuck a little, the second time used parchment paper – both times I found it to be a little too light on the bottom for my liking, but still: AMAZING.
I’m in Denmark, so don’t have access to the same flours as you, but for the people out there, half tipo 00/half stone ground wheat flour works a charm☺️
Thank you Justine!
incredible foccacia and thank you for the very detailed recipe!
I’m so glad you loved it!
This looks amazing; would it be possible to complete in one day if I began early in the morning, and did a slightly shorter fridge rise? Or skipped the fridge and left it at room temp? Thank you!
My best advice is to do a shorter room-temp rise (around 1 hour), it will take away some of the gluten in the dough, but the bread will still be delicious.
This was the first recipe I made with my new stand mixer, and it did not disappoint! I few notes:
– I was able to do this with stiff starter, so it’s quite versatile!
– I did not have a nonstick pan like the one recommended in the recipe, so if you also don’t, I would not recommend putting the dough in the pan until after the overnight rise as it will be almost impossible to do slap and folds on top of parchment paper. Instead, I did the slap and folds and overnight rise in the mixing bowl. I also left the dough to rise overnight and then some, taking it out around 5pm the next day.
All in all, SUCH a delicious recipe and I can’t wait to make it again!
I’m so so glad you loved it and thank you so much for your review and helpful feedback/tips for others! <3
Leave a Comment
Made this recipe? Tell me all your thoughts or if you’ve got any questions!